Page Contents
Enabling Active Directory Integration
To synchronize Active Directory (LDAP) user accounts with Output Messenger Server user account, in Server Manager > Configuration and enable the Integrate Active Directory Authentication option & provide the LDAP Hostname.
 By enabling this option, users can sign in to Output Messenger by using their AD(Active Directory) User Accounts.
For multiple LDAP servers, use a comma-separated list of the host in LDAP Hostname. (Ex. server1.company.com;server2.company.com)
Active Directory Settings
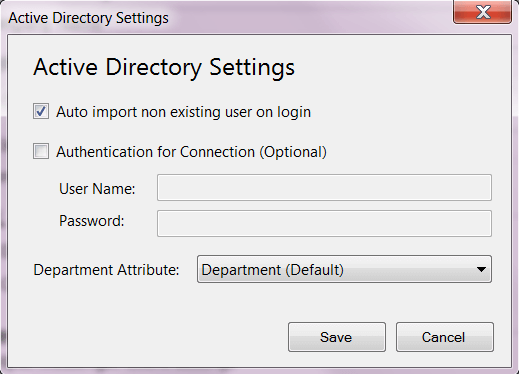
By clicking on the Settings icon present near the LDAP Host Name option, you can view the Active Directory Settings pop-up.
- Auto-import non-existing user on login:
Enable this option to auto import the non-existing users into Output messenger from Active directory while logging in directly. - Authentication for Connection(Optional):
If you wish to enable authentication for Active directory connection, you can enable this option & set username, password for connection. - Department Attribute:
Choose the AD field from which you want Output messenger to auto import the User Department name. The imported name will be added to Output messenger User -> Department field.
How it works ?
When a client logs in to Output Messenger, his/her login credentials will be validated with the Output Messenger server local database.
Case 1:
If his/her log-in details were not matched and the “Integrate Active Directory” option is enabled in the Output messenger server, the following will happen.
Output messenger server will connect with the specified Active Directory host & validate the credentials of the user who attempted to log in.
Case 2:
If his/her log-in details were matched, then the client details will be imported to the Output messenger server local database. And the client will get authorized.
The AD User Password will not be stored in Output messenger local database. All the other details of the AD user will be saved.
So, on each log-in, the user credentials will be validated with AD.
Manual Import of AD Users
Other than on-fly import of AD user on login, we can also manually import all AD users to local database, for grouping purpose.

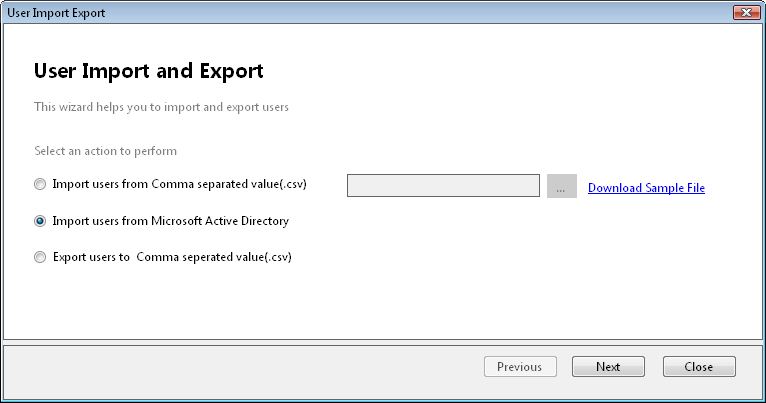
Step 1: In Server Manager, Choose File > User Import and Export. The User Import Export window opens.
Step 2: Select “Import Users from Microsoft Active Directory” and Click Next.
Step 3: Provide LDAP Hostname.
Step 4: Select Current User Option, if your account has appropriate permissions to connect to the AD & import users OR select the Specified Account option, provide the login details of the user account who has enough permission.
Step 5: Click Next. You will be listed the AD users to select for import.
Step 6: Select the needed users & click “Import“.
Grouping LDAP Users
By default, the imported AD users will be stored under the Group matching their department name. We can also update the group of the user manually by editing the user.
