With Microsoft’s Group Policy, you can install the Output Messenger Client software remotely on your Client computers through its MSI Installer package easily and save the time.
At first, download the Output Messenger Client Software’s MSI Installer from the following page and extract it.
www.outputmessenger.com/lan-messenger-downloads/
Page Contents
Create a Distribution Point
Create a distribution point on the publishing server with following steps.
- Log on to the Server as an Administrator.
- Create a folder with the name like OutputMessenger MSI Package.
- Right-click on the created folder and then click Sharing. In Sharing properties window, enable Sharing for all users on the network.
- Copy the Output Messenger MSI installer (OutputMessengerSetup.msi) file from the extracted folder and Paste in the newly created shared folder OutputMessenger MSI Package.
Create a Group Policy Object (GPO)
Create a GPO through following steps to distribute the Output Messenger Client Software.
- Click Start, then click Administrative tools. Open the Active Directory Users and Computers snap-in window.
- In the console tree, Right-click your network domain, then click Properties.
- Click the Group Policy tab, and then click New button.
- Type a name for this new policy (for example, “OutputMessenger MSI distribution”) in the Name field then press Enter key.
- Click Properties in the new Group Policy window, then click Security tab.
- Select Apply Group Policy checkbox for the security groups you want to receive the installation package. If you want all users on the network to receive the package, simply enable the option for All security groups on the tab.
- When you have finished, click OK.
To update an existing Group Policy Object (GPO)
- First, download the latest installation file, OutputMessengerSetup.msi, and place it in a network location accessible to all domain users.
- Next, locate the installation file by clicking the Start button and navigating to Windows Administrative Tools ➜ Group Policy Management.
- Open Group Policy Management by finding your Group Policy Object (GPO) used for deploying Output Messenger in the domain. Right-click the GPO, and select Edit.
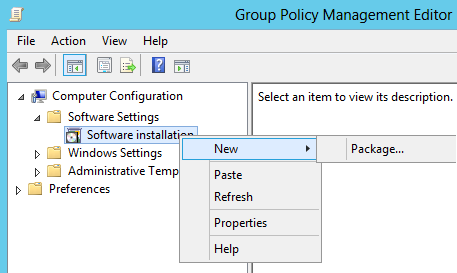
- In the Group Policy Management Editor, navigate to Software installation in the left-hand pane. Right-click Software installation, hover over New, and select Package.
- In the dialog box, select the OutputMessengerSetup.msi file from the location specified in step 1. The file path should appear as follows: \\server\Output Messenger\Update\OutputMessengerSetup.msi. Click Open, then click OK in the Deploy Software dialog box.
- In the package’s Properties dialog box, go to the Upgrades tab and ensure that the Upgrade Output Messenger line is present.
- If you’re updating Output Messenger, ensure you’ve added all previous packages to the list and select “Package can upgrade over the existing package” for each package.
- Click OK to close the package’s Properties dialog box.
- Configuration of the GPO is complete. Once the GPO deployment in the domain is finished, Output Messenger will automatically update after each computer restart.
Deploy the Software with MSI Installer
Now, you can deploy the Output Messenger MSI Installer through following steps.
- Click Start, then click Administrative tools. Open the Active Directory Users and Computers snap-in window.
- In the console tree, right-click your network domain, then click Properties.
- Click Group Policy tab, select the policy that you created (OutputMessenger MSI distribution), and then click Edit.
- Under Computer Configuration, expand Software Settings.
- Right-click the Software installation, click New, and then click Package on the slide-out menu.
- In the Open dialog box, type the full Universal Naming Convention (UNC) path of the shared installer package that you want to install on the network computers.
- NameOfSharedFolder → OutputMessenger MSI Package
- FileNameOfMsiPackageToInstall.MSI → OutputMessengerSetup.msi
- Click Open.
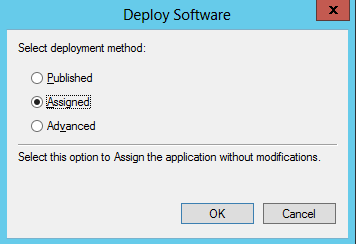
- On Select deployment method console, select a deployment method.
- If you choose Published option, the software won’t be installed but it will be placed in the Add and Remove Programs. The Users have to install the software from there.
- Assigned option can be used to deploy the software on the Client Users Machines. It would install the application automatically when the computer is starting up.
- Advanced option can configure the Published or Assigned options and apply modifications to the package.
- For this practical, you can select Assigned. It would remotely install software for client users. Click on OK.
- The package will be listed in the right-pane of the Group Policy window.
- Close the Group Policy snap-in, click OK, and then close the Active Directory Users and Computers snap-in.
For example,
"\\FileServer\NameOfSharedFolder\FileNameOfMsiPackageToInstall.MSI."
Note: Don’t use Browse button to access the location. Make sure that you use the UNC path of the shared installer package.
We can see three options i.e. Published, Assigned and Advanced.
That’s all! When the client computer Re-starts, the Output Messenger Client software package is automatically get installed with default parameters.
Refer Output Messenger Client Parameters and Values to know more about parameters.
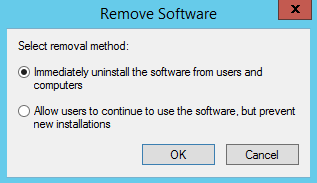
Uninstall the Software through Group Policy
Deploy the Software with MST Installer
It isn’t possible to pass Parameters (switches) to an MSI file deployed with Group Policy.
However, you can use Transform file (MST) to install Output Messenger Client with Custom parameters through Group Policy by following the steps given below.
Create Transform (MST) file
Using ORCA tool, which is part of the Windows SDK Components for Windows Installer Developers, Edit the entries of MSI file and create Transform (MST) file.
- To use ORCA, simply Drag the MSI file onto the program.
- Select New Transform from the Transform Menu.
- Apply all required changes and select Generate Transform.
- ORCA will then ask for the name of new Transformation file.
Microsoft provides some guidelines for using ORCA on following page:
http://support.microsoft.com/kb/255905/
Deploy MST with Group Policy
Create a Distribution Point (update the newly created MST file also at the shared folder ‘OutputMessenger MSI Package’) and Create a Group Policy Object (GPO) as pointed initially.
- Click Start, then click Administrative tools. Open the Active Directory Users and Computers snap-in window.
- In the console tree, right-click your network domain, then click Properties.
- Click Group Policy tab, select the policy that you created (OutputMessenger MSI distribution), and then click Edit.
- Under Computer Configuration, expand Software Settings.
- Right-click the Software installation, click New, and then click Package on the slide-out menu.
- In the Open dialog box, type the full Universal Naming Convention (UNC) path of the shared installer package that you want to install on the network computers.
- NameOfSharedFolder –> OutputMessenger MSI Package
- FileNameOfMsiPackageToInstall.MSI –> OutputMessengerSetup.msi
- Click Open.
- On Select deployment method, select Advanced. If you select another option, you won’t able to apply the MST file you created.
- Open Modifications tab.
- Select your MST file (that customizes your installation) from the network share.
Note: Again it is very important to use a UNC to the file (to the network share), rather than a local / network drive path.
- Click OK to complete the setup.
- Close the Group Policy snap-in, click OK, and then close the Active Directory Users and Computers snap-in.
For example,
"\\FileServer\NameOfSharedFolder\FileNameOfMsiPackageToInstall.MSI."
Note: Don’t use Browse button to access the location. Make sure that you use the UNC path of the shared installer package.
That’s all! When the client computer Re-starts, the Output Messenger Client software package is automatically get installed with the parameters (switches) you customized.
Refer Output Messenger Client Parameters and Values to know more about parameters.
Enjoy the Deploying with MSI and MST files.


